Wise v7.0.5 release notes
Release Date: July 2023
Introduction
This release of [product name] provides [number of new features and enhancements] in addition to numerous bug fixes. These features will help you manage more complex workflows, including:
- Display remaining renewals in staff applications
- Improved MARC viewer display
- Configure OPAC filters
- Secure vendor file transfers
- Bibliotheca cloudLibrary integration
- Select invoice to pay improvements
- Disable remember password for staff accounts
- Console circulation improvements
- Circulation receipts
- Holds foundational work
- Show customer details on check out screen
- Title display in Console catalog (245/title view)
Many of these enhancements are the direct result of your feedback.
Recommended actions
For this release, we recommend that you review the following checklists and complete the relevant tasks so that you can adjust your policies and workflows and train your staff. These checklists identify updates that we have determined as significant for most institutions. We encourage you to review all of the items in the release notes to determine whether there are other items that might require additional action or follow up by your institution.
Access codes and privileges
Caution: Due to a change in the access codes and permissions, the permissions for the System Administrator role ( (WISEBHR00) must be set to 1-0-0 at function MANAGER_MANAGEMENT_ACCESS CODES_AUTHORITY before moving to version 7.0.5. Please check your permissions before you are scheduled to update to 7.0.5.
Administrative actions
These items require immediate action or decisions.
| Action |
|---|
|
New features and enhancements
Display remaining renewals for staff
View remaining renewals in the Wise Client
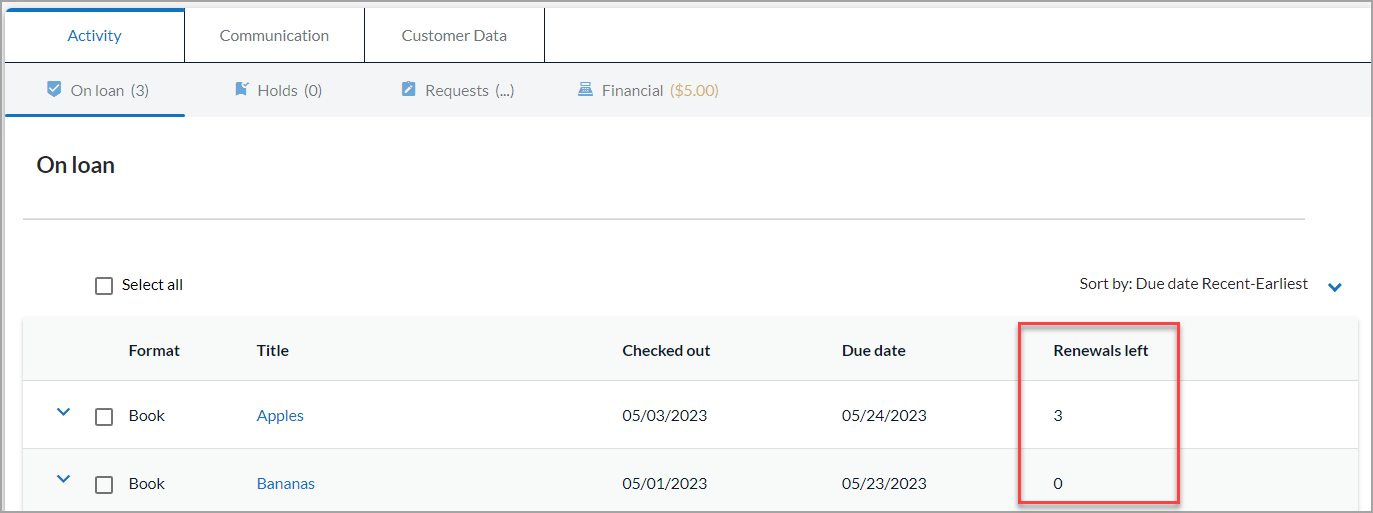
Staff can now see how many renewals remain for customers' checked out materials. Access to remaining renewals information allows library staff to provide better service to customers.
Note: If the checked out item is place on hold by another customer, the item may not be renewed, so remaining renewals is subject to change.
To view remaining renewals on a checked out item:
- In the Wise Client, go to a customer record and view Borrowed items.
- Double-click on a borrowed item line. The Line item details window opens. A new line, Renewals left displays:

View remaining renewals in the Console
Remaining renewals display in the Wise Console on the On loan screen.
Improved MARC viewer display
Viewing and editing MARC data in your title records using the Wise Client has been improved. The MARC viewer size has been enlarged to display more data on the screen immediately. A horizontal scroll bar was added so that you can see more data on the screen without having to resize every time you open the MARC viewer.
In addition to the enlarged window, the edit screens have been improved to show more data in the entry fields. Edit screens open at a larger size and fields that allow additional data automatically expand so that all of the information can be viewed in the window. These improvements will cut down on clicking and dragging to make the window bigger and will allow you to see more information immediately.
To use the MARC viewer tool, launch the Wise Client, then search the Catalog. Double-click on a title to view the record and use the tools button to view title details. Once in the title record, go to Options > MARC viewer.
Double-click on a MARC tag line to view more information about that tag. The display window opens and expands to show all of the information in the tag description. It is no longer necessary to scroll to the side, or copy and paste the information into another application to view and edit the details. As the user types more information into an expandable box, it will scale so that all of the text is visible.

Configure OPAC filters
The Results filter in your library's OPAC can be configured to differentiate between your library's collection and your third-party digital collections (e.g., cloudLibrary, Hoopla, Libby), and to display differently based on the library organization or branch from which the patron is visiting. You can also customize the text that describes these filters.

This process requires working with OCLC support to update the values. If you are interested in changing the filter behavior in your OPAC, please contact support.
Secure vendor file transfers
For libraries that transmit vendor files electronically through Wise, the connection security has been improved. If the vendor supports secure file transfer protocol (SFTP), it can now be configured for use in Wise. Previously, the process offered only a file transfer protocol (FTP). To enable secure file transfers, in the Manager, navigate to Management organizations > Addresses > Vendors by institution. Click Change to make edits to the vendor settings. Check the SFTP Enabled box and click OK to save changes.
Bibliotheca cloudLibrary integration
Libraries with a Bibliotheca cloudLibrary eContent subscription can now integrate cloudLibrary into their OPAC. The integration experience will be similar to OverDrive and Hoopla integrations. This integration will make it easy for library patrons to discover, request, and check out cloudLibrary eContent from the OPAC, instead of having to separately log into the cloudLibrary website. They can also easily access their checked-out content from their account in the OPAC.
The integration includes changes to the following areas:
- Manager: Creating a new system option for adding account information and enabling the integration
- Indexing: Including cloudLibrary titles and cover art in Wise search results, availability information, the operation of Facets, and the "Sort on" filter.
- Facet terms: Providing the supplied terms for facet-related metadata (e.g. Language, Material type) in such a way that they can be included in the internal "crosswalk" reference table to combine facet values with values from other third-party providers and the library's own nomenclature
- Full Title View: Displaying cloudLibrary titles in a Full Title View page with all relevant operations (e.g. Checkout, Hold) and data (e.g. metadata, availability, NoveList recommendations)
- Access operations: Providing customers with the appropriate methods to consume the materials by linking directly to cloudLibrary, downloading to the customer's device, etc.
- My Account: Including cloudLibrary title information in My Checkouts > Digital Content and My Holds > Digital Content displays
Configure Bibliotheca cloudLibrary
To enable your cloudLibrary collection to appear in the OPAC, the service must be configured.
In the Wise Manager, enable the system option EXTCCLL.
Next, add cloudLibrary to your external systems. In the Wise Manager, navigate to Management organizations > External systems > cloudLibrary.
Click New, the EAC - External accounts window opens. Provide the following information, available from your vendor:
- Account ID
- Access key
- API URL
- Library ID
- Library URL ID
- Web reader URL
Click OK to save.
Once the settings have been configured, you will need to clear your Manager cache.
cloudLibrary in the OPAC

When a library customer searches for titles in your library's catalog, if there are results in your cloudLibrary collection, they will appear in the search results. Results can be filtered using the Results for option in the filters.
Select invoice to pay improvements
We have made improvements to the workflow of the Pay Invoices feature (released in the first 2023 upgrade) to improve the confirmation process for paying invoices.
Previously, when you paid an invoice using the Pay Invoices feature, you could not see the total amount paid for the selected invoices. You had to open the BIRT report in order to see the price and then manually calculate the total. In addition, once you paid the invoices, there was no confirmation that the invoices were successfully paid. We have added a final success confirmation to complete the workflow.
These improvements will help make the invoice payment process more efficient and also increases confidence that the invoices were successfully paid.
Improved payment confirmation dialog
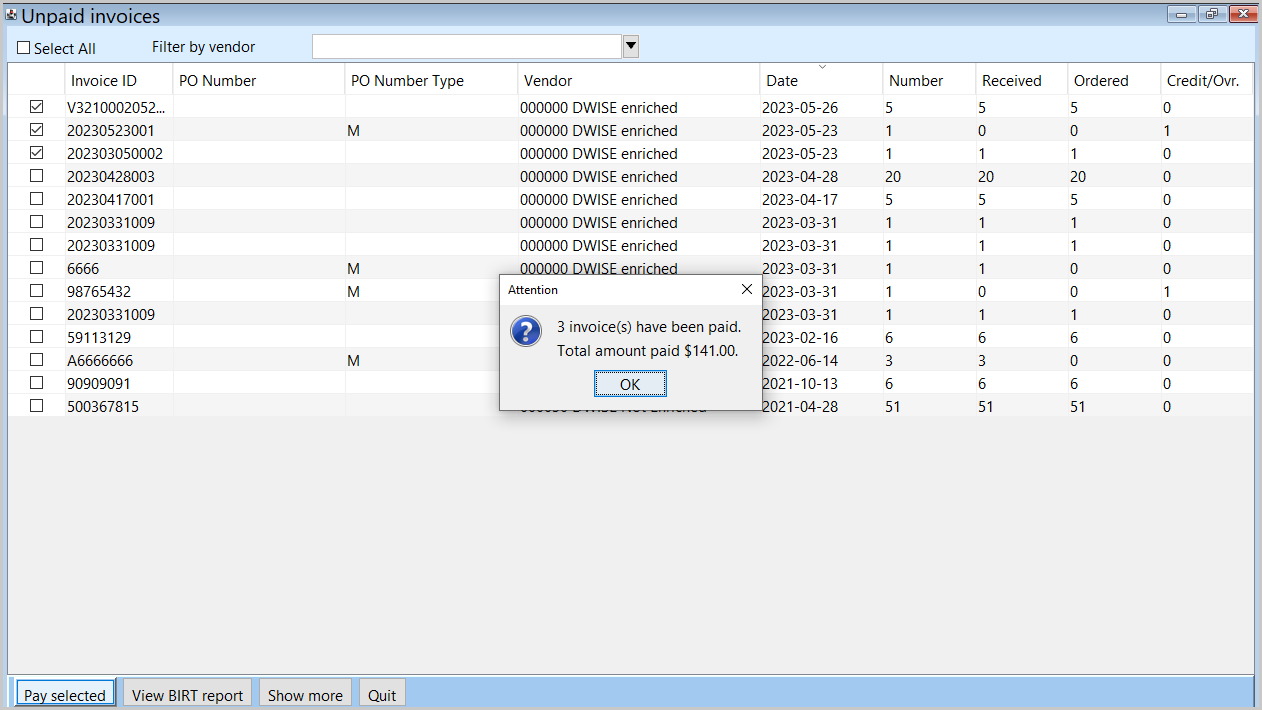
After selecting invoices to pay and clicking the pay selected button, a confirmation dialog box will appear that includes the number of invoices to be paid and the total amount that will be paid.
New success message
After clicking the Pay selected button, a new dialog will appear to confirm that the invoices were successfully paid. The new dialog includes the number of invoices paid, and the total amount paid.
Disable remember password for staff accounts
To improve login security for Wise, it is now possible to assign a role function to block staff passwords from being saved when signing into the Wise Client. The new role is Block passwords from being saved in the client. This function can be added and applied to any existing role via the Manager.
To apply this role to an existing role:
- Navigate to systemWise > Access codes and authorizations > Access authorizations.
- Select the role to which you want to apply the change.
- Check the box next to Block passwords from being saved in the client.
- Double-click in the first three columns of the table and the configuration window opens.
- Set the permission level and click Save.
Users with this role will now be required to enter their password each time they sign into the Client. This prevents unwanted users from logging into workstations with remembered accounts and improves access and security in Wise.

Circulation in the Console
Circulation receipts
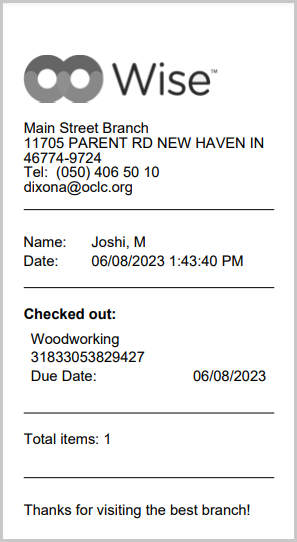
Check-in and check-out sessions now have the option to print receipts at the end of the session in the Wise Console.
Once an item is scanned, a Print receipt(s) toggle can be found at the top right hand side of the page. When the Print receipt(s) is set to On and the End Session button is selected, the receipt will print as a PDF in a new tab.
Note: The Print receipt(s) toggle is set to Off by default.

If multiple customers have been helped within a single session, a pop-up will display with customer barcodes. You have the option to select which customer(s) need a printed receipt. An individual receipts will be printed for each customer selected.
Note: All customer barcodes will be selected by default.
Accept payment for customer fines and fees
Until this release, it was only possible to waive customer fines and fees. With this new version, staff will be able to complete transactions and accept all of the payment types configured for your library. Customer financials are accessed within a customer record on the Activity > Financials tab. To pay a fine or fee, check the box next to the line item(s) you wish to settle and click the Resolve button at the top of the panel. A Resolve charges box opens. Select the Payment method being used by the customer from the drop-down and enter the amount tendered. Click Resolve to complete the transaction.

A payment receipt is generated.

Holds Foundational Work
There is a new set of features available that serves as a foundation for additional holds functionality in the Console.
Item Level Holds
When placing holds in the Console, you can now place item level holds in addition to title level holds. This will help staff who need to select a specific item record to place on hold for a customer or to recall to their Technical Services department.
You can place item level holds in two ways:
Place an item level hold from the items screen in Catalog
After searching for a title, click on the "Group" tab. Select the item to place on hold by clicking the checkbox next to the item. The Place title level hold button changes to Place item level hold. Click the button to place an item-level hold.
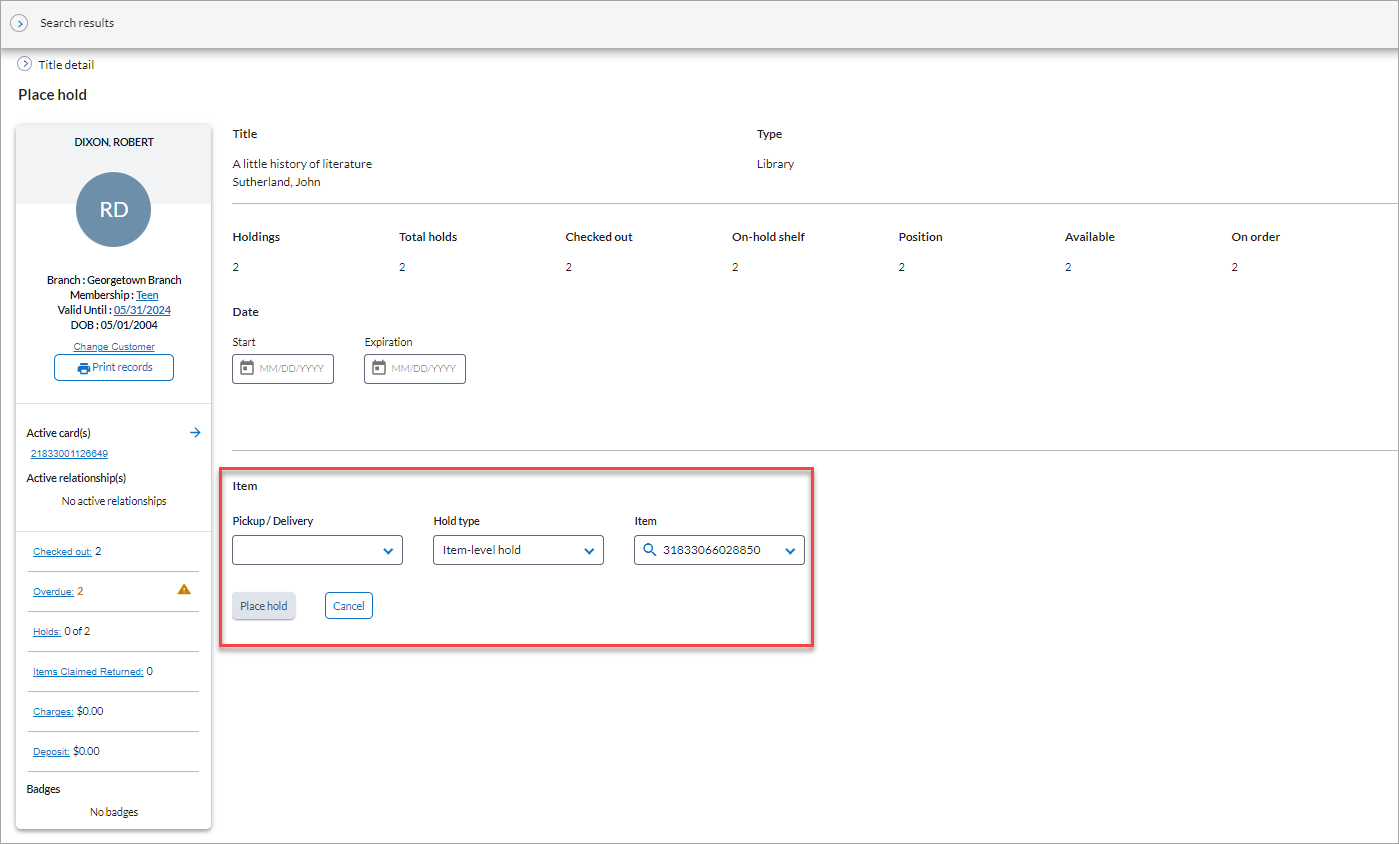
The Place hold screen opens. There is now an option to choose the Hold type and item record.
The Item field is a drop-down that shows all eligible item records for the title.
The Item field contains the following information:
- Item barcode
- Item status
- Item location

If desired, you can change the hold request to a title-level hold by choosing from the drop-down in the Hold type field:

Place an item level from a title-level place hold screen
If you select title level hold from the Details or Group tab, you can change the hold type to Item-level hold (and vice versa) from the Place hold screen.
Once in the Place hold screen, select Title-level hold in the Hold type field.
Once selected, the Item drop-down appears. You can proceed with placing the item-level hold.
Material type added to hold screen in customer record
A new Material type field is added to the holds detail in the customer record. This is an improvement over the current Wise Client.

Picklist and Holds shelf BIRT reports added to Console
You can now print the Picklist (in the Wise Client, called Shelf list) BIRT report and the Holds shelf BIRT report from the Console. For both reports, you can use the same criteria to customize the report that is currently available in the Client. In addition, the same default selections are pre-populated. This is the first step in the development of the Console Picklist and Holds shelf.

Picklist BIRT report
After navigating to the Picklist tab in Circulation, click on the "Print" button. A criteria dialog appears. After making your selections, click "Print." The Shelf List BIRT report opens in a new browser tab.

Holds shelf BIRT report
After navigating to the Holds shelf tab in Circulation, click on the "Print" button. A criteria dialog appears. After making your selections, click "Print." The Holds shelf BIRT report opens in a new browser tab.


Show customer details on the check out screen
The check out screen in the Console will now display an overview of a customer's account after you scan their barcode. This will help staff quickly assess the account and handle any outstanding issues. The following details display in the summary:
- Customer name
- Barcode
- Branch
- Membership
- Items out
- Overdue
- Holds
- Charges
Note: At this time, only the customer name is linked to the customer record. In a future release, other underlined text will link directly to that area of the customer record.
Title display in the Console
Titles in the Console display the full title, subtitle and volume information. Select a customer, choose the Activity sub tab and click "On Loan", you will see titles that have been loaned to a customer. In this section you will see that MARC 21 tag 245 $n (volume indication) and $p (volume title) are now displayed in the Console.
The volume name and indicator display within the Title column, in alphabetical order.
Bug fixes
A summary of bug fixes and updates can be found on the Wise weekly updates page.
| Module/area affected | Issue/bug | Details/fixes |
|---|---|---|
| Wise Console | Item requests may display another ID number in Item request manager | Item requests now display only the requesting patron's primary library card number (Item request manager > Manage requests > expand a request). If the patron's primary library card is block, the field will be blank until the card is unblocked. Previously the patron's driver's license or other ID number may have been displayed |
| OPAC | Login/sign up header information is missing on the Wise login page | Login and sign on header information is now present on the Wise OPAC (native and Joomla). Previously this information was not present in some situations. |
| Client | Issue exporting a dataset in MARC21 format with holdings from Selections | Staff can now create and export a MARC 21 dataset from Selections (Statistics and Selections > Selections). Previously an error prevented successful export of the dataset. |
| My Account | Item request manager field names missing on mobile devices | When using a mobile device to make an item request (My Account > My requests > New request), the fields are now clearly labeled. Previously the field labels did not display on mobile devices. |
| Client | Titles not moving to the back catalog when their last item is discarded | When there are no items linked to a title record, the title record is automatically moved to the back catalog in the title updater job (titupd). Previously titles were not moving to the back catalog as expected. |
| Items with status T (transport) could not be reserved Edit section | Items with status T (transport) are now available for reserve in the owning library. Previously these items were not available for reserve by any library, including the owning library. | |
| Customers' pause holds not being honored | Customers' pause holds are now being honored, even if the library organization where the item is available has no system option PAUSHLD. Previously when system option PAUSHLD is set for a specific branch, and the hold is placed as a library system hold, a library without the PAUSHLD option would still fulfill the hold. | |
| Client | Text color makes some Client drop-down lists unreadable | Text color is now black in Client drop-down lists. Previously some of the Client drop-down lists used white as the text color. |
| Client | Outstanding fine amount disappears from the customer screen when checking out | The outstanding fines amount remains visible on the customer screen during checkout. Previously the amount would disappear (visually) during checkout; the amount would reappear with a refresh. |
| Marketing Workbench | Unable to copy Selection criteria for customers in Marketing Workbench | Copying an existing Selection with customers does not display an error message now and creates a duplicate customer selection with the same name and "Copy:" as prefix. |
| Client | Institution ID added in the 'Block details' field |
When applying a general block to a patron, the institution ID, as well as the user ID, of the user applying the block is now part of the "Block details" field in the Client. Previously only the user ID, and not the institution ID, was included in the detail note. Customer administration > select a customer > Properties > Apply a general block |
| Client | Visibility of related members fines and fees in a newly created member relationship |
After adding related family members/customer through the customer properties screen, fines and fees from the related members are immediately visible, through the Children button, in the financial overviews. Previously the user had to restart the Client or move to another tab before the Children button would be visible. Client > Customer > Financials |
| Client | Visibility of related members fines and fees | The fines and fees overviews now show all items for the customer and related family members when requested through the use of the Children button on those reports. Previously the overviews showed only up to 24 items - even when more items were associated with the customer and related family members. Client > Customer > Financials |
Translation updates
-
In Areas of interest email, "View Online" OPAC link will now display tab name in English as "New arrivals for category: xxx.."
-
In the Wise Console, on advanced Customer search page, the Sector section labels are updated to - Library, Theater, SchoolWise, MediaWise, Newsletter and Donor
Important links
Post-release sessions
To help you become familiar with the new features, enhancements, and improvements included in this release, there are [number of update sessions] update sessions scheduled. Please note the session time zones when registering. The sessions will be recorded and archived for future viewing on the OCLC Community Center. Please register, even if you are unable to attend, to receive a link to the recorded session.
Support website(s)
Support information for this product and related products can be found at:


