Wise v8.0.2 release notes
Release Date: Autumn 2025
Introduction
This release of Wise provides a number of new features and enhancements in addition to numerous bug fixes. These features will help you manage more complex workflows, including:
- Placing and managing holds in the Console
- Editing item records in the Console
- Viewing availability of items in the OPAC
Many of these enhancements are the direct result of your feedback.
Watch a video
Wise v8.0.2 release highlights
Run time: 2:44
This brief video highlights the core features and improvements in the Wise v8.0.2 release.
Recommended actions
For this release, we recommend that you review the following checklists and complete the relevant tasks so that you can adjust your policies and workflows and train your staff. These checklists identify updates that we have determined as significant for most institutions. We encourage you to review all of the items in the release notes to determine whether there are other items that might require additional action or follow up by your institution.
Administrative actions
These items require immediate action or decisions.
| Action |
|---|
|
To enable the ability for staff to view holds on a title, enable the system option UHLDCON: Display the unprocessed holds tab on the Title plage in the Wise console. |
| To allow patrons to choose a preferred pickup location outside of their library organization, enable the system option PPLOCAT: Enable patron preferred pick up location and configure the PPL branch group. |
| If your library would like to include the Available now filter in the OPAC, submit an OCLC support ticket. |
| If your library would like to hide the category field in the catalog, set the system option HCATGRY: Hide category field for items in the client and console to No. |
| To enable new email validation for patrons, submit an OCLC support ticket. |
| Contact OCLC Support to enable search suggestions in the OPAC. |
New features and enhancements
Console holds
Staff can view holds on a title
The Unprocessed Holds screen provides essential information so that staff can fully assist patrons when placing hold requests. This information is now available in the Console, as a new tab on the Title Detail screen.
The data on the Unprocessed Holds tab is the same in the Client and Console, but there are some additional features in Console.
Note: If you would like to see the Unprocessed Holds tab, enable the system option UHLDCON: Display the Unprocessed holds tab on the Title page in the Wise console. This is a system-level option.

View unprocessed holds:
In the Console, navigate to a title and click on the “unprocessed holds” tab to see the Unprocessed Holds screen:

- Sort order: The tab opens with a default sort order, below. Staff can use the columns to manually sort on any field.
- Hold priority ascending, then
- Hold ID, descending
- Tab: The Unprocessed Holds tab includes the count of holds on the title. This allows staff to view the number of holds on a title at-a-glance without having to click into the Unprocessed Holds tab.
- Links: In the Console, you can click on the customer name to go to the customer’s My Holds screen in the customer administration screen.
- Show customer: By default, customer names are not populated. Click the “show customer” checkbox to display customer names.
- Columns:
| Label | Description |
|---|---|
| Position | The position of the hold request in the hold queue |
| Priority | The hold priority (default priority is 2) |
| Request ID | Hold request ID |
| Type | Type of hold (ILL, System, Network, Branch) |
| Customer |
Customer name Note: By default, the customer name is not displayed. To display customer names, click the "Display customer name" checkbox. |
| Placed at | Where the hold was placed |
| Status | The current status of the hold request |
| Pickup/Delivery |
The branch where the hold will be picked up by the patron |
| Hold condition | If the hold request won't be filled until another hold is filled first, the hold request ID for the prerequisite hold is displayed. |
| Group number | If the hold request is part of a group hold (partial or sequential), the group ID is displayed. |
| Sector | Catalog type (not in use in the US) |
| Start date | Hold start date (not in use in the US) |
| Pause date | The hold pause date, if set |
| Resume date | The hold resume date, if set |
Staff can check in Held items
When checking in a held item, staff will see a decision modal with two options:
- Retain: Checks in the item while maintaining the hold request, printing a new hold slip
- Remove: Checks in the item and cancels the associated hold request, allowing the item to:
- Go in transit to its owning location
- Be trapped for another hold request
- Become available for checkout
Note: This behavior matches the existing functionality in the Client

Workflows for placing holds are improved
Beginning in the 8.0.2 release, there will be a series of improvements to the Console place hold workflows. These changes will make the process of placing holds in the Console more intuitive and streamlined. The 8.0.2 improvements include:
User Interface Enhancements
- Success Message: Snackbar notification appears for 10 seconds when a hold is placed
- Cancellation Confirmation: A new modal confirms the cancellation before staff cancels an in-process hold request.
Improved Navigation Flow
- After successful hold placement, staff are redirected to:
- Unprocessed Holds screen (if enabled)
- Title detail screen (if Unprocessed Holds disabled)
- If hold placement fails, staff remain on the place holds screen with error message
- If staff cancels the hold request, they return to the title detail page
Staff can define custom hold receipts
For this release, the Wise development team created a generic vertical hold receipt template as well as personalized hold receipt templates based on individual library systems’ specific requirements.
These receipts will be available through the Wise Console. Libraries can choose to use the new generic vertical hold receipt (see image below) or one of the other library custom receipts.
The new receipt can be installed on upgrade, or later after installation, by the Wise team.

Console search and navigation
Staff can search for items by unique identifiers
This release brings significant enhancements to the Wise Console's search capabilities, allowing staff to quickly locate records by scanning or typing unique identifiers. This update introduces two highly-requested features: item barcode search and ISBN search.

A convenient dropdown menu in the Catalog Search area now lets you select between different search types:
- Title
- Keyword – Standard keyword search
- ISBN – Scan or type in an ISBN (10 or 13-digit format). If there is a single match, Wise will navigate directly to the title detail screen. If there are multiple search results, they will display in the catalog search results screen.
- Item
- Barcode – Scan or type an item barcode to immediately access the item’s detail screen. This allows users to quickly look up an item without checking it in, simplifying the process of checking status on misplaced items and processing items that need special attention.
These features are immediately available to all Wise Console users. No additional setup is required - simply navigate to the Catalog Search area and select your desired search type from the dropdown menu.
Staff will experience consistent customer search
The customer search experience has been standardized across all areas of the Wise Console to provide library staff with a more consistent and efficient workflow when looking for customer records.
This improvement provides:
- Unified Search Field: All customer search interfaces now allow searching by either barcode OR name in the primary search field
- Consistent Results Display: Search results are now displayed in a standardized format across all Console areas
- Streamlined Workflows: Removed redundant steps in search processes, such as unnecessary toggling to advanced search tabs
When a barcode or part of a name is entered into the search field, suggested results will populate below the field. Here, you will see the customer last and first name, library card number, branch, email and phone number. Click or use your keyboard arrow keys to highlight and select the desired result.

Customer search has been implemented in the following workflows:
- Customer administration: The main customer search screen
- Circulation: Check-out workflows
- Catalog: When placing holds for customers
- Relationships: When adding relationships between customers
- Interactions: When processing customer interactions
- Point-of-sale: When adding customers to transactions
No additional setup is required to use this feature. Simply navigate to any customer search area in the Console and begin using the standardized search field to look up customers by either barcode or name.
OPAC and My Account
Patrons can choose a default pickup location
Patrons can now choose a default hold pickup location from any configured branch in their holds network.
Key Features
- Select Default Pickup Location: Available in OPAC, Console, and Client
- Expanded Options: Not limited to patron's registered library organization
- Statistics & Selections Support: Search for patrons by their default pickup location
- Improved OPAC workflow: Patrons can now select their preferred pickup location while placing a hold request.
Note: A new system option PPLOCAT: Enable patron preferred pickup location controls this feature at the System or LO level:
- When Enabled (YES): Patrons can select and manage their preferred pickup location
- When Disabled (NO): Home Branch continues to function as the default pickup location

OPAC: Select, view and manage preferred pickup location
When enabled, patrons can:
- Set a preferred location when placing a hold using the "save as preferred pickup location" checkbox
- View and edit their preference in My Account → My Account Details
- Have their preferred location automatically selected for future holds
Note: Patrons can change their preferred location but cannot remove it completely.
Select preferred pickup location when placing a hold
A new “save as preferred pickup location” checkbox is available on the place hold modal. This option will be saved and is visible in the patron’s My Account screen, the Console and the Client.

The next time the patron places a hold, their selected preferred pickup location will be the default pickup location. They can change their preferred pickup location by selecting a new one, or via My Account.
View and change preferred pickup location in My Account
A new “preferred pickup location” field has been added to the patron’s My Account Details screen in My Account. The patron can view and update their preferred pickup location. The LO is automatically added if the system contains multiple LOs, to make it easier to identify the LO in large systems:

To Edit, click the Edit link. A modal appears:

Select a new library/branch combination (if the library has one LO, the library system drop-down will not appear.)
Note: Because some pickup branches may not be enabled for preferred pickup, the list in My Account may be different than the list of pickup locations when placing a hold.
Console: View and edit a patron's preferred pickup location
Staff can view and edit a patron’s preferred pickup location in the Console. The field is located in the Customers tab > Customer data > Preferred pickup location.
To edit the patron’s preferred pickup location, select a new branch from the drop-down menu. The default pickup location when placing a hold for the patron will change to the selected branch.
Note: Whether the Preferred pickup location tab is visible depends on the staff’s logged-in LO and the patron’s Main (originally registered) branch. See Behavior of Preferred Pickup locations, below, for more information.

Client: View, edit and create sets based on preferred pickup location via Statistics and Selections
View and edit preferred pickup location
Staff can view and edit a patron’s preferred pickup location in the Client. The field is located in Customer Administration > Address Details.
To edit the patron’s preferred pickup location, click “change” and then select a new branch from the drop-down menu. The default pickup location when placing a hold for the patron will change to the selected branch.

Note: Whether the Preferred pickup location tab is visible depends on the staff’s logged-in LO and the patron’s Main (originally registered) branch. See Behavior of Preferred Pickup locations, below, for more information.
Create sets based on preferred pickup location in Statistics and Selections
A new preferred pickup location field for patron sets is now available. You can now run sets by preferred pickup location to help identify all patrons with a particular default pickup location. This can be especially helpful if a branch is closing for a period of time and staff want to bulk-update the patron data to a new default pickup location.
The Preferred pickup location field is always available in Selections, but you must have the feature enabled to bulk change the field.
To find the Preferred pickup location field, navigate to the Statistics and selections tab > Selections. Then select a category type of Customers and a Category of ALGE.

Behavior of preferred pickup locations:
When the PPL option is enabled
When configured, patrons and staff can select default pickup locations based on these criteria:
- A new branch group PPL - Can be set as preferred pick-up location defines which locations can be set as preferred pickup locations
- Invalid pickup group (V995): Branches in this existing Main branch group never appear as pickup options, even if included in the PPL branch group.
- Patron’s main branch
- The branch where the patron was originally registered (distinct from Home Branch and never changes)
- Only branches defined in the PPL group for the patron’s Main Branch will appear as options
- Delivery Method
- Patrons with configured delivery methods (e.g. books by mail) retain their existing workflow.
- Delivery method settings override Preferred Pickup Location.
- Hold Networks
- Patrons can only select locations within the same hold network as their registered LO.
- Non-Configured Locations
- Locations not configured as preferred pickup locations prompt the message: "Chosen location not allowed as preferred location"

- Locations not configured as preferred pickup locations prompt the message: "Chosen location not allowed as preferred location"
When the PPL option is disabled
- Patrons continue using the Home Branch field in OPAC to change their default pickup location
Note: The "library" field in My Account Details has been renamed to "Home Branch" to distinguish it from "default pickup location"

Configure preferred pick up branches
Add and define a PPL branch group
- In the Manager, navigate to Management Organizations Networks and Branch Groups Branch groups per branch.
- Click New. The Branch classifications screen opens.
- Select PPL - Can be set as a preferred pick-up location from the list of options.
- Click OK. The new group is saved.

Once the PPL branch group is added, populate the group with all branches that will participate in preferred pickup location.
- In Branch Groups Per Branch, click Open next to the PPL group:

- Click New to add the branches to the group.
- Add the branch code and branch description and click OK:

- For each branch, define the list of default pickup locations:
- Within the PPL branch, select a branch and click Open.

- Click New and select a Main branch group, branch, or LO from the drop-down:

- Click OK.
- Repeat as needed until each branch contains the preferred pickup branches.
- (Optional) If desired, you can create new Main branch group(s) to define the list of pickup branches. Then, you can assign the new Main branch group(s) to the branches in the PPL branch group. This is useful if the list of preferred pickup branches will be the same for most or all of the branches.
- Within the PPL branch, select a branch and click Open.
Patrons can filter by "Available now"
A new filter is added to Wise OPAC catalog search page to filter only the available items in the library. This will enable the patron to quickly check the available items on the shelf to check out immediately.
When enabled, the Available now filter offers a check box for "At the library". Once selected, it filters down to the branch the catalog is focused on (the branch indicated in the URL).
Note:
- Available Now filter is only applicable to the items in the library and not for third party online resources.
- This filter is enabled by default. If you wish to disable it, please contact OCLC support to submit a request.

OPAC will display search suggestions to confirm intent in the catalog
With this release, libraries can now offer patrons and enhanced search suggestion options when searching in OPAC. This feature allows patrons as soon as they type at least three characters in the search bar; to view and select from a list of suggested titles they may be intending to type further or just in general seeking suggestions from a keyword, thereby saving them little time and effort.

The new search suggestion has improved response time at the stroke of third character/keystrokes. These include numbers, letters, special characters and punctuation.
In the suggestion list, the suggested terms will be displayed weighted/bold, and the matching terms will be displayed unweighted.
The scope of the suggestion list is within All (everything), Author, Series, Title and Subject, providing most relevant unique suggestion for the searched keywords. This functionality will consider the existing boost and relevancy introduced with the "improved search relevancy" feature in OPAC.
Configure search suggestions
To enable this feature, contact OCLC Support.
Note: Joomla users need to configure this option in Joomla, see Joomla release notes.
Cataloging and acquisitions features
Staff can edit catalog item records
Following this release, Wise will support item record management capabilities in the Console. This enhancement allows catalogers and library staff to edit and manage item records directly in the web-based interface, eliminating the need to switch to the Client application for common tasks.
To edit an item record, search for a title in the Catalog, select the item, and click Edit to make changes.

Editable fields display with an outline around the data. Once changes have been made, click Save at the top of the screen.
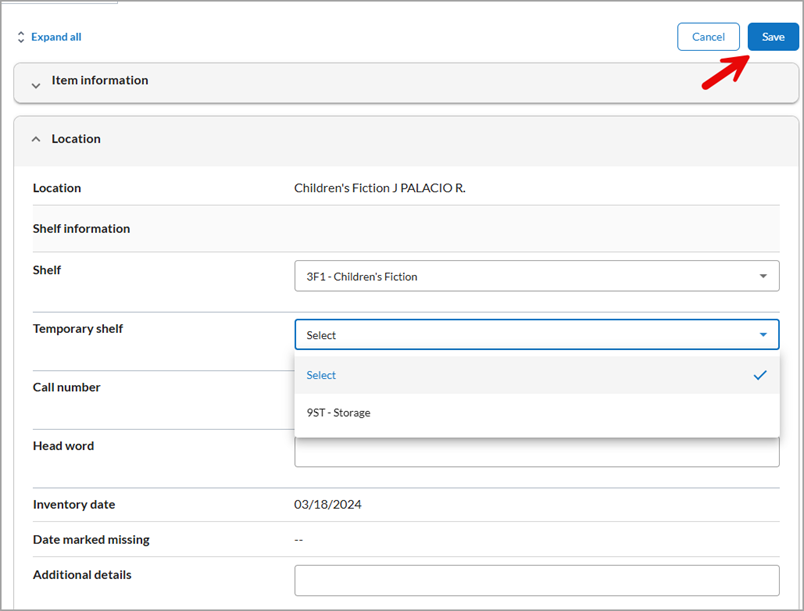
Additionally, a new item field has been added to the item record. Item serial number is a free text field with a 60-character limit. This field is intended for tracking equipment (laptops, hotspots) by serial number.
This feature is available to all Wise Console users with appropriate permissions. Library administrators can configure staff permissions through the user management interface to control access to specific item editing capabilities.
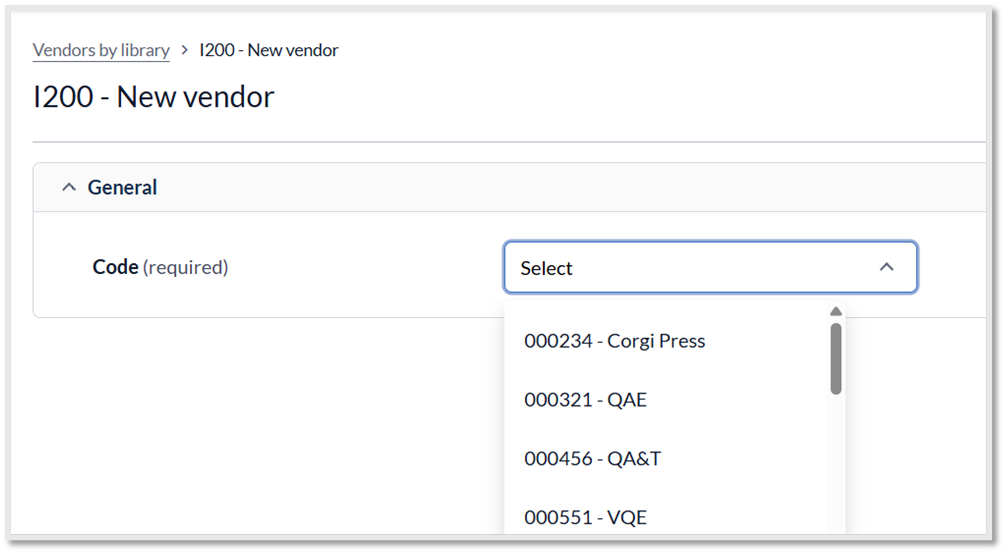
Acquisitions staff can add and edit vendor details
In 8.0.2, it will be possible to view, edit, and add vendor information from the configurator in the Wise Console.
The Central vendor table and Vendors by Library table will be available to view on the left panel.
View vendors
In the Wise Console, go to the Acquisitions tab and Select the Central vendor table. The list of vendor records created will appear in the right panel. Select a vendor to view.

To view more information, use the scroll bar to the right. Use up or down arrows to expand or collapse fields.

Edit a vendor
To edit a vendor, select the vendor to view and then click on Edit.

Click on a field to edit. When edits are completed, select Save.

Any required fields that have not been completed will display and be highlighted in red with the text “This field is required” after you have saved edited fields. These required fields must be completed and saved to continue.

Select Cancel if you do not wish to save the edited fields.
Add a vendor
Select the Central vendor table and select + New to add a vendor.

Enter the vendor’s information into the work form that displays. For detailed information about the vendor fields, see Add a Central Vendor.
Select Save after vendor fields have been completed for the new vendor. Select Cancel to exit the new vendor without saving the new vendor record.
After saving, any required fields that have not been completed will display with the message “Correct errors before saving” with the fields highlighted in red.

Correct the required fields and then select Save to continue saving the new vendor record.
Vendors by library
To view vendors assigned to a library, select Vendors by library.
Select a library to view the assigned vendors:

The list of vendors assigned to the library will display.

Add a new vendor
To add a new vendor, select the library and then select Save. Choose a vendor from the drop-down list, and then select Save. Selecting Cancel will exit without saving changes.
The selected vendor will be added to the library, and will now appear in the list of vendors for the library:

Edit or delete a vendor in Vendors by library
Select the vendor, and choose edit or delete.

If Edit is chosen, the work form for the vendor will be displayed. Fields that are editable will be highlighted. Once edits are completed, select Save.
To delete a vendor, select the vendor and under Actions, select Delete. A message appears alerting that the vendor will be deleted. Select Delete to continue. This action removes the vendor from the library’s vendor list.

Filtering the list of vendors is available in the Central vendor table and the Vendors by Institution table. Select the filter button to the right of the vendor list.

Select the column data and value. Select + Add filter to add additional filters. Select Apply when completed.

Select Remove all to remove selected filters. The filtered vendor results will be displayed. The filter will indicate if filters have been applied and display the number of filters applied to the search.

If additional rows are available for vendor lists, this will be indicated at the bottom of the list. Select the arrows to move forward or backward in the list of vendors.

Conditionally display the title category field
It is now possible to hide the NBD category fields in the Wise Client and Console if your library does not use these values. When the fields are hidden, the Category will no longer display in the following locations:
- Client – Item detail screen
- Client – Item linking screen
- Client – Order requests screens
- Console – Item detail screen
To hide the Category fields, set system option HCATGRY – Hide category field for items in the client and console to No.
Email handling
Postmark
With this release, we will move to Postmark to send messages from Wise. Postmark is a spcialized email service that ensures fast and reliable email handling.
This move means:
- Emails are delivered faster
- Postmark uses DKIM (DomainKeys Identified Mail) to verify that emails are really from Wise. This helps prevent messages from being marked as spam.
- Postmark makes it easier to manage and monitor email bounces so we can resolve delivery issues immediately
In the Wise manager (systemWise > Messages), you will find a new option, Postmark configuration where you can configure email domains. This feature instantly returns the correct data so that it can be easily entered into the DNS server.
For more information about the Manager configuration, see Postmark configuration. For more information on general Wise email settings, see Email settings.
Email validation enhancement
We're introducing a more robust email validation system to ensure the quality of email communications sent from Wise. This update will:
- Implement a new account-based validation process
- Require validation for all newly added or changed email addresses
- Automatically re-validate existing email addresses over time (will be completed within two release cycles)
- Prioritize validation for newly added or changed addresses
This enhancement helps reduce bounced emails and improves our ability to quickly detect and respond to potential email delivery issues. The system will only send validation emails to addresses that require verification, minimizing unnecessary communication.
Once enabled, patrons will need to confirm an address when a:
- New user registers
- New user is added through ingest
- Existing user email address is updated
- Existing user configures the same BCC1 and BCC2 address
Because all customers have to revalidate their e-mail address, we will send messages per library explaining the process and why this is necessary. Customers who don't validate their email address will receive a reminder over time. A new type of message has been created for this: the PVX message.
For more information, see My account overview, Public messages and Address details tab.
To turn on the enhanced email validation, please submit a support ticket to OCLC.
Bug fixes
OPAC
- Author filter no longer includes corporate author values.
- Author filter no longer displays multiple results for the same name.
- Cover art is clear on title details page.
- The language of a title displays the correct values instead of showing the additional translations on the search results screen.
- Missing title details in More information have been added in the new OPAC.
- Title descriptions now appear on the title detail screen for electronic resources.
- An error message no longer displays when using the Forgot password option to sign into My account.
- Patron birthdate now displays correctly – no longer off by one day.
- Customers can report a lost library card in My Account
- My account details groups Username, Password and PIN in the same information block.
Financials
- Paid transactions are resolving correctly and no longer leaving a $0.01 balance on the patron’s account
- Patron’s payment history is displaying correctly in the Console.
Manager
- The (TABFLC) Floating collections table displays the correct values in the RMT code column.
Important links
Support website(s)
Support information for this product and related products can be found at: