Wise v8.0.1 release notes
Release Date: April 2025
Introduction
This release of Wise provides a number of new features and enhancements in addition to numerous bug fixes. These features will help you manage more complex workflows, including:
- Customer holds enhancements in My List
- Grouped search results
- Enhanced filtering for OPAC search
- Link to item request form in search results
- Budget management improvements
- Expanded shelf conversion rules to include BISAC
Many of these enhancements are the direct result of your feedback.
Watch a video
Wise v.8.0.1 release highlights
Run time: 2:01
This brief video highlights the core features and improvements in the Wise v.8.0.1 release.
Recommended actions
For this release, we recommend that you review the following checklists and complete the relevant tasks so that you can adjust your policies and workflows and train your staff. These checklists identify updates that we have determined as significant for most institutions. We encourage you to review all of the items in the release notes to determine whether there are other items that might require additional action or follow up by your institution.
Administrative actions
These items require immediate action or decisions.
| Action |
|---|
|
To enable group holds in My account, set system option HOLDTYP to Yes. Note: Wise community must be enabled for patrons to access the additional lists. If disabled, the patron can place grouped holds (if enabled) and bulk holds on My Wish List. |
|
If you would like to display OPAC search results in group format, the following actions must be done:
|
| To enable enriched filtering in the OPAC, set the system option OPACMSF to Yes. |
| To display budget warnings when ordering in the Wise client, set system option BUDWARN to Yes. |
New features and enhancements
Place group and sequential holds in My List
Grouped holds overview
Patrons can now place partial and sequential holds in the OPAC when logged into their account. When more than 1 hold is selected in a patron’s Wish List or Additional list(s) (community lists), a modal with grouped hold options will appear:

Configure Grouped holds
Libraries can enable or disable the ability for patrons to place grouped holds. In the Manager, to go Management Organizations > Library Organizations. For each library organization, click on the “Detail” button. In the Library Organizations configuration screen, use the “Customer may submit multiple holds at the same time from the wish list” checkbox to enable (checked) or disable (unchecked) group holds in the OPAC.

If disabled, the patron will still be able to place holds in bulk on either their Wish List or their Additional (community) lists (see below).
Note: Wise community must be enabled for patrons to access the additional lists. If disabled, the patron can place grouped holds (if enabled) and bulk holds on My Wish List.
A note on the HOLDTYP system option:
Also note - the HOLDTYP system option must be set to YES in 8.0.1, regardless of whether you want to Enable Group Holds, but it is a temporary system option that will be removed in 8.0.2. This was part of the transition to the new OPAC in 8.0.0.

Selecting titles for grouped holds
Patrons must choose more than one hold from the list of titles in My Wish List or their Additional (community) lists to place grouped holds.
To select titles to group, a patron must log into My Account in the OPAC. From My Menu, open the My Lists tab. The patron’s lists are displayed. Choose any list to open the details:

Select (check) at least 2 titles from the list and click the “place hold” button at the top of the list.
The patron can also choose to remove titles from their list(s) after they have placed the holds by clicking the checkbox at the bottom of the modal.
Note: Clicking “place hold” on an individual title will open the hold modal for a single hold, even if more than one item is checked.
Ineligible titles
If one or more titles are not eligible for hold, a modal with details about which title(s) is ineligible appears. Grouped holds can still be placed on the remaining items in the list.

Place grouped holds

Standard:
Selecting “Standard” places holds on the selected items, with no special grouping. The holds will be fulfilled whenever they become available. Standard holds are available for patrons whether or not grouped holds are enabled.
Partial group:
Partial group holds will fulfill the first hold request in the group when it becomes available. When the first request is fulfilled, all other hold requests in the group will automatically be canceled.
Partial group holds are useful for patrons who need one item, but the item can be any format or can be a single book from a group of titles on a similar subject. It helps speed up hold fulfillment for the patron.
To place Partial group holds, select the “Partial group” radio button and click “Place hold.” A green success message will display when the holds are placed.

Sequential:
Selecting “Sequential” holds will fulfill the selected titles in order as specified by the patron. After one hold request has been filled and the item checked out, the next hold will be placed as soon as possible.
Sequential holds are useful for book series, to ensure that the patron receives the items in the correct series order, and doesn’t receive them too early.
To place Sequential group holds, select the “Sequential” radio button and click “Place hold.” The sequential hold modal appears. The patron can adjust the order of the sequence before the group hold is placed.
Note: Because of the nature of grouped holds, patrons cannot pause any holds within a partial or sequential group hold, either during hold creation or editing existing holds.
Manage grouped holds
If a patron has placed more than one type of hold, the “My holds” screen will now sort the holds by type. To view all of the holds within a type, and manage the holds, click on the hold type:

Manage standard holds
Patrons can now select a set of standard holds from the My holds screen and move the holds to a new group. They can choose either partial or sequential hold types. Patrons cannot move standard holds to existing groups.

Manage partial holds
Patrons can take the following actions on partial holds:
• Delete one or more partial holds
• Update the pickup location for one or more partial holds
• Move one or more partial holds to a standard hold
• Pausing/unpausing one or more partial holds
• Move two or more partial holds to sequential holds
Note: A new group is created if holds are moved to partial or sequential hold types. Holds cannot be moved to an existing group.
Manage sequential holds
Moving holds
• Patrons can only move sequential holds to a new hold type if all of the active holds are selected.
Updating pickup location(s)
• The patron can update the pickup location on one or more sequential holds. This will not affect the hold sequence.
Pausing/unpausing sequential holds
• One or more sequential holds can be paused without disrupting the sequence order.
Deleting holds
Because of the nature of sequential holds, deleting holds in different positions of the sequence can have different effects on the sequential group.
- Deleting the last one or more holds - Sequence remains the same for the remaining holds
- e.g., 7 sequential holds and holds 5, 6 and 7 are deleted
- holds 1 - 4 remain
- e.g., 7 sequential holds and holds 5, 6 and 7 are deleted
- Deleting first one or more holds
- e.g., 7 sequential hold and holds 1, 2 and 3 are deleted
- holds 4 - 7 remain, but their sequence number is updated to 1 - 4
- e.g., 7 sequential hold and holds 1, 2 and 3 are deleted
- Deleting in the middle of a sequence
- E.g., 7 sequential hold and holds 3, 4, and 5 are deleted
- There will now be 2 unrelated sequential hold groups:
- holds 1 and 2 display as a group with sequence 1 and 2
- Holds 6 and 7 display as group with with sequence 1 and 2
- There will now be 2 unrelated sequential hold groups:
- E.g., 7 sequential hold and holds 3, 4, and 5 are deleted
- Deleting the second hold of a sequence
- e.g., 7 sequential holds and hold 2 is deleted
- Last set of holds display as group starting with sequence 1
- Hold 1 is no longer seen as a sequential hold (since no hold is waiting for it and it is not waiting on any other hold) and displays in the standard holds page
- e.g., 7 sequential holds and hold 2 is deleted
View Community statistics
Libraries can now access detailed community statistics via the OCLC Community Center site. The new feature includes a link that will be activated on the platform, allowing users to view historical records since their library’s go-live date on Wise Community.

The statistics displayed include:
- Period: Displayed in months.
- Patrons: Registered in the period. Click the number to view a list of usernames.
- Votes: Thumbs up on a title.
- Reviews: Click the number to view full reviews.
- Tags
- Lists
Display OPAC search results in a grouped format
Grouped search overview
This enhancement improves the user experience by grouping titles in the library collection with the same name, author, media group, and language under a single record. This makes it easier for patrons to see all formats and editions of the same title together and helps them place holds based on availability. The external titles (ex: CloudLibrary, OverDrive etc.) are still displayed as individual records and not grouped with the Wise titles.
Grouped search results
• Titles with the same name, author, media group, and language are grouped and displayed under one single record.
• This feature simplifies the search process, allowing patrons to navigate through various records seamlessly.

Enable grouped search
- Grouped search can be turned on or off at the institution (Library organization) level.
- Steps to enable:
- Navigate to Wise manager > systemWise > systemWise > System options.
- Search for the option OPACGRP (By default, this option is turned off at the system level).
- Turn on the option for the institution you want the catalog search to be in grouped view.

Update media groups
- This is a prerequisite for grouped search. Media types in the system need to be mapped under each media group.
- Steps to define media groups:
- Navigate to Wise manager > Wise > Catalog > Searchlight settings > (TABMCG) Media group searchlight.
- Define the media groups (e.g., Books, Movies, Music).

- Steps to map media types:
- Navigate to Wise manager > Wise > Titles and SCAT management > System tables > (MDT) Media type.
- Map all media types to the media groups defined in the TABMCG table.

How grouping works
- Three FRBR keys are generated for each title:
- FRBR Key 1: Unique key for records with the same title name and author. Title name is used based on the rule table below.
- FRBR Key 2: Within the first group, a second unique key based on the media group.
- FRBR Key 3: Within the media group records, a third key based on the language listed on a title. If there are multiple language listed on a title (for example, movies usually have primary language and dubbed languages are listed), only the first language from the list is used for generating the key.
- Titles with the same set of keys are grouped together under one record and displayed as a group.
FRBR Key 1 rule table
| Step | Rule | Wise title value | MARC21 value |
|---|---|---|---|
| 1 | If there is a uniform title (TX010), take this as the title | TX010 | 130 $a, $m, $n, $r, $f "$g" ; $k ($o) $s |
| 2 | If there is a uniform title (TX045), take this as the title | TX045 | 240 $a, $m, $n, $r, $f "$g" ; $k ($o) $s |
| 3 | If there is an original title (TX086), take this as the title | TX086 | 534 $a |
| 4 | Otherwise take the publication title (TX001) | TX001 | 245 $a |
| 5 | Add the additional title (part/sequence) (titels.deelaand / titels.deetitel) | Titels.deeland titels.deetitel |
245 $n, $p, $b |
| 6 | Add the main/first author | Author |
Grouped record display
• Information displayed includes cover art, title name & language, author name, and description summary.
• Media types within a group are displayed as tabs with availability status.
• Under the media type tab, all the titles/editions are collapsed by default and shows add to list and place hold options.
• Expanded view shows publication year, edition name, availability, total copies, and hold options for each edition/title under the media type.
• The editions/titles under a media type are sorted by availability and then by the publication year so that available titles of recent publication come at the top.

Title detail page enhancements
• A new section shows all formats of the selected title owned by the library.
• Availability information, number of copies, and additional editions are displayed.
• If the title is available in other languages, they are displayed under ‘Other languages’.
Change groupings
• To change the way a title is grouped, update the title information (title name, author name, media type, language).
• Changes may take up to 10-15 minutes to reflect in the search results.
Enriched filtering for OPAC search
Enriched filtering overview
With this release, libraries can now offer patrons an enhanced filtering experience when searching in the OPAC. This new feature allows patrons to select multiple filters within each facet, enhancing the search experience. For instance, patrons can now filter search results to show both books and ebooks simultaneously.

Configure enriched filtering
To enable this feature, set the system option OPACMSF to Yes in Manager -> SystemWise -> System Options.
Design enhancements
Checkboxes
Each filter value now includes a checkbox, allowing patrons to select multiple options within each facet.
Publication Year Filtering
• Patrons can filter search results by publication year in two ways:
• Enter a custom year range in the "Custom Year Range" field and click "Apply Year Range" to filter results.
• Choose from preset filters for quick filtering options.
• Search results can be filtered using both options simultaneously. If a custom year range matches a preset filter exactly, the preset filter will be automatically selected.
• Clicking the "Reset" button under the custom year range will clear any values entered in the "From" and "Through" fields.

Filter chips
Selected filters are now displayed as chips at the top of search results. Patrons can easily remove previously selected filters by closing the chips or clear all filters by clicking on the "Clear All Filters" link.

Link to item request form in search results
It is now possible to display a suggestion to submit an item request in the OPAC search results. The request suggestion appears a the end of the search results display.
If the user is already signed into My account, they will be taken immediately to the My purchase requests screen. If the user is not signed into My account, they will be directed to sign in, and then they will arrive on the My purchase request screen.

Note: Your library must already be using Item request manager in Wise to enable this feature. Patrons must have permissions set in My menu configuration to place a request in order to use this feature.
To enable this feature, set system option OPACIRL to Yes.
View message history in My Account
It is now possible for library patrons to see their message history in My Account.
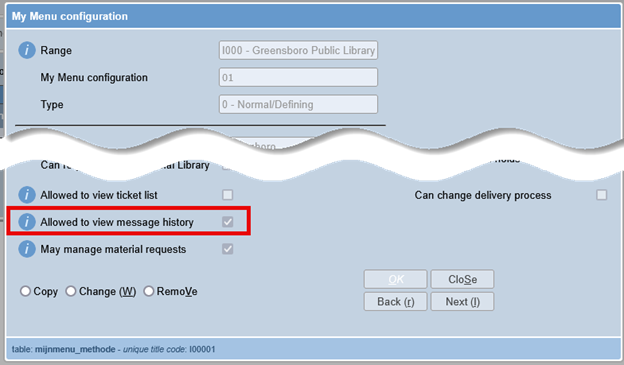
When this is enabled, patrons will see a menu item called Message history. On that page, they will be able to see the same messages that are visible to staff in the Client.

On the Recently received messages page, customers can view message history, by date. The Subject field describes what kind of message was sent and the title column includes title details related to the message. In a future release, if a file was generated for the message (for replacement cost billing), it will appear in the File column of the table.
View budgets in the Console dashboard
Library staff can access Acquisitions in the Console to view budgets. This feature allows staff to view current and closed fiscal years, search for funds and filter results, view transactions against the fund, and access information for the transaction.
To access Acquisitions in the Console, library staff would begin with selecting Acquisitions > Budgets.
- The current open fiscal year displays by default. The fiscal year date range displays, and the transaction totals for the fiscal year are displayed with a progress bar and percentage amounts. Library staff may select a different fiscal year to view by accessing the drop-down menu in the upper right corner of the Budget display.
- Library staff can select an assigned branch to view.
- Library staff can select the fiscal year to view. Both open and closed fiscal year information will display.
- Search and select a fund to view detailed information about the fund in the General Tab and Transaction tabs.
- The General tab includes the total allocation, total used, fund name, fund code, and beginning allocation for the selected fund. A progress bar will show the fund’s total spent, encumbered, available and pending amounts.
- The Transactions tab will display a list of transactions against the selected fund. The transactions are organized by date and display the link to the order for the transaction.


Display remaining budget amount and warnings in the Client
As an order admin, you can now see the remaining budget to help you monitor your spending. The remaining budget is visible on the order screen, next to the budget field. The remaining budget is calculated and retrieved from the database whenever the owner or budget is changed. If the amount is negative, the text will display in red. If the budget is below zero, a popup warning will appear when opening the order screen and when the owner or budget is changed.
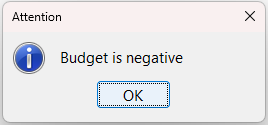

To enable this feature, the System option BUDWARN – Show warning on a negative budget must be set to Yes in the Manager.
New status for items on deleted orders
In Wise, when old orders are deleted in the manager, the items on those orders were assigned status A - Discard. This could skew discard statistics because those items were never received. Going forward, items that are removed from the system when an order is deleted will be given the status '@' instead of 'A'.
Expand shelf conversion table to support BISAC
Shelf Conversion has been expanded to include BISAC codes so that libraries can align their collection and placement based on BISAC classification. Library staff can create shelf conversion rules for BISAC classifications that will automatically assign the correct shelf when linking new items.
Library staff will continue to use the table BISAC within Titles and SCAT management to store their BISAC code definitions.
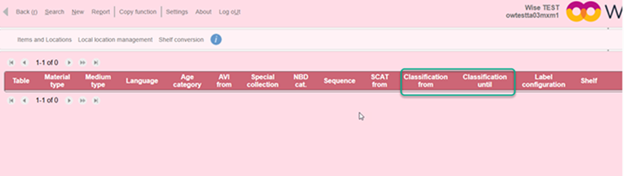
Library staff will define their Classification (new field) in (TABKSC) ShelfCon classification – Items and Locations > Local location management. The code “TW1” indicates a BISAC classification.

Associate a Label configuration and Shelf with a BISAC code range by defining the “Classification from” and “Classification to” for a Label configuration and Shelf in the Shelf Conversion table – Items and Locations > Local location management > Shelf conversion.
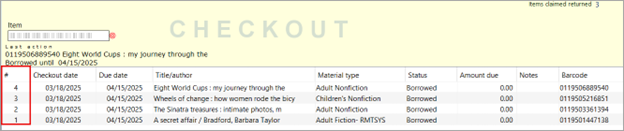
View circulation count in the client
A sequence number has been added to the check-in and check-out screen. The sequence number is located on the left side of the screen and is incremented with each check-in/check-out. The sequence number is also visible for borrowed items. It is now easy to see how many items Wise has processed during check-in/check-out.

Wise configuration log report improvements
In the January release, a configuration log report was added to the Wise Manager. This report is enhanced in this release. With the April release, the report will be expanded to include the table type and description. These values will provide clarity when changes are made to tabelitems, tabelopties and bctabel tables and will provide a description of the exact table that was updated.
The retention period of this report has been increased from 14 days to 365 days.
Bug fixes
New OPAC
- When a user forgets their password and attempts to reset it, they will receive a success message indicating an email has been sent with instructions for resetting their password.
- The online registration process has been updated so that the patron must fill in all mandatory information before they can Subscribe.
- The Digital tab in My Account now shows the patron’s borrowed digital items without displaying an error message.
Enhancement
The top pane of the main page of the new OPAC is now configurable. The library can decide which, if any, of the options display: branch switching, shopping cart, and language options. This feature is available for configuration in the Manager.
Important links
Support website(s)
Support information for this product and related products can be found at: