Checked out
Note: The Wise Console is still in development, and some features may not yet be available.
Checked out
Items that are currently checked out to the customer can be viewed within the Checked out section of the Activity tab.
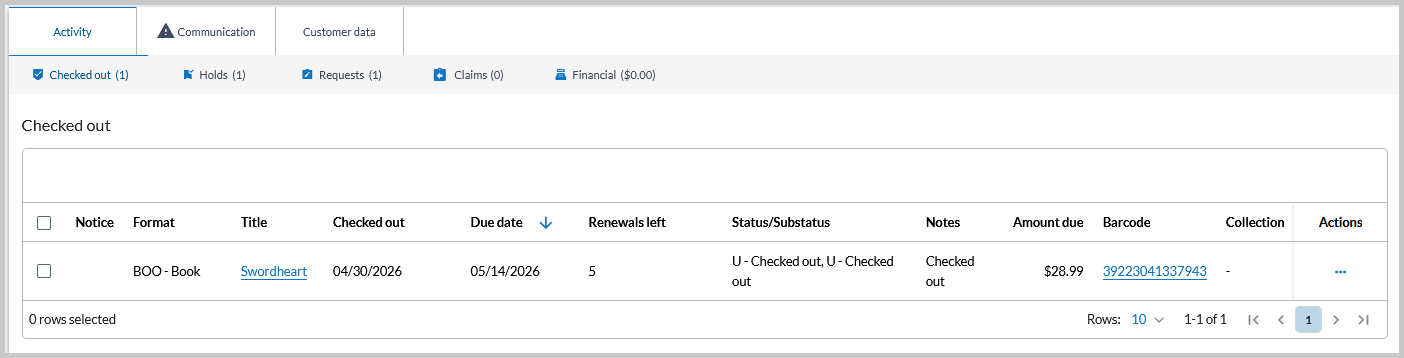
The following information is available for checked out items:
| Field | Description | ||||||||||
|---|---|---|---|---|---|---|---|---|---|---|---|
| Notice | Contains information about the status of the item (ex. Item overdue will show for late items). | ||||||||||
| Format | The material type of the item. | ||||||||||
| Title | The title associated with the item.
Note: If the item is currently overdue, a yellow exclamation point and a note stating that the item is overdue appears below this field. |
||||||||||
| Checked out | The date that the item was first checked out. | ||||||||||
| Due date | The due date of the item. | ||||||||||
| Renewals left | The number of times that the item can still be renewed. | ||||||||||
| Status/Substatus | The status/substatus of the item. | ||||||||||
| Notes | Details surrounding the loan and notifications related to the loan appear in this field. | ||||||||||
| Amount due | Indicates the outstanding fine on the item. When the item is returned, borrowed, or renewed, the total amount of the cost will display. | ||||||||||
| Barcode | The barcode of the item | ||||||||||
| Collection | When the item is returned, the collection code for items from changing collections is shown. | ||||||||||
| Actions |
Click the arrow (
|
Actions
The following workflows can be completed using the Actions button on the Checked out screen.
Note: Additional bulk workflows for renewals and fines that are not completed via the Actions column can also be found below. See Bulk renew and Bulk register fines for more information.
Renew a single item
To renew one or more items from the customer screen in the Wise console.
- Navigate to the Activity tab > Checked out tab.
- Click the three dots in the Actions column for the item to be renewed. See Bulk renew below for the bulk renewal workflow.
- Select Renew from the drop-down menu of options.
- A confirmation dialog box appears. Click Renew to continue with the renewal.
- If the item can be renewed, a confirmation of the renewal will appear. Click OK to dismiss the confirmation dialog.
- If the selected item cannot be renewed, a dialog appears with the title and the reason it can't be renewed. Click OK to dismiss the confirmation dialog.
Note: The ability to renew a blocked item depends on the role of the logged-in staff member and the configuration of the desk pattern for renew messages in the manager.
Once the renewal has been completed, the Due Date and Renewals left columns in the Checked out list for the renewed items are now updated. If the items was overdue, a fine will be applied to the customer account, and the charge will appear in the customer's Activity > Financial tab.
Bulk renew
To bulk renew items from the Checked out tab:
- Navigate to the Activity tab > Checked out tab.
- Use the checkboxes next to the checked-out items to select the items you would like to renew.
Note: To select all Checked out items, click the checkbox at the top left of the list of checked-out items:

- Once at least one item has been selected, a Renew button will appear above the Select all checkbox and list of checked-out items. Once all items have been selected, click the Renew button
- A confirmation dialog box appears. Click OK to continue with the renewal.
- If any of the selected items cannot be renewed, a dialog appears with the titles and the reason(s) they can't be renewed. Click OK to dismiss the confirmation dialog.
Note: The ability to renew a blocked item depends on the role of the logged-in staff member and the configuration of the desk pattern for renew messages in the manager.
The Due Date and Renewals left columns in the Checked out list for the renewed items are now updated. If the items were overdue, a fine will be applied to the customer account, and the charge will appear in the customer's Activity > Financial tab.
Register fine
To register a fine for overdue items:
- Navigate to the Activity tab > Checked out tab.
- Click the three dots in the Actions column for the item to be renewed. See Bulk register fines below for the bulk fine workflow.
- Select Register fine from the drop-down menu of options.
- If the item is not overdue, a dialog message will appear stating that "no overdue item(s) selected."
- If the item is overdue, the Register current fine dialog message will appear. This message lists the following:
- The number of selected items that are overdue
- The number of selected items with ongoing fine(s)
- The number of selected items that won’t be processed
- The current fine amount for the selected item(s) that will be registered.
- Click Register fine to apply the fine.
- When this button is clicked the following will occur:
- A success modal appears. At this point, the register current fine workflow is complete, and you can select All done to exit.
- An option to pay the registered fine(s) will also be available. If desired, click Pay now to open the Console payment module.
Note: Items in the following statuses will not be processed during the register current fine workflow:
- M = Missing
- F = Checked out and invoiced, bill printed
- N = checked out and invoiced, but bill hasn’t been printed
Bulk register fines
To bulk register fines for items from the Checked out tab:
- Navigate to the Activity tab > Checked out tab.
- Use the checkboxes next to the overdue item(s) to select the item(s) you would like to register a fine for.
Note: To select all Checked out items, click the checkbox at the top left of the list of checked-out items:
- Once at least one item has been selected, a Register fine button will appear above the Select all checkbox and list of checked-out items. Once all items have been selected, click the Register fine button
- If none of the selected items are overdue, a dialog message will appear stating that "no overdue item(s) selected."
- If at least some of the selected items are overdue, the Register current fine dialog message will appear. This message lists the following:
- The number of selected items that are overdue
- The number of selected items with ongoing fine(s)
- The number of selected items that won’t be processed
- The current fine amount for the selected item(s) that will be registered.
- Click Register current fine to apply the fine(s).
- When this button is clicked the following will occur:
- A success modal appears. At this point, the register current fine workflow is complete, and you can select All done to exit.
- An option to pay the registered fine(s) will also be available. If desired, click Pay now to open the Console payment module.
Note: Items in the following statuses will not be processed during the register current fine workflow:
- M = Missing
- F = Checked out and invoiced, bill printed
- N = checked out and invoiced, but bill hasn’t been printed
Replacement cost
To add a replacement cost for a lost or damaged item that is checked out to a customer:
- Navigate to the Activity tab > Checked out tab.
- Click the three dots in the Actions column for the item for which a replacement cost will be added.
- Select Replacement cost from the drop-down menu of options.
- The Replacement cost for damaged/lost items form opens.
- The title and item barcode will be automatically populated on the form and cannot be edited.
- Add the cost of the item, any associated fines, and a billing note (optional).
- To waive a fine, click the Waive fine toggle below the item information. To print an invoice, check the Print invoice box below the toggle.
- Click Submit. A bill is generated on a new browser tab and can be printed for the patron.
Note: It is currently only possible to generate a replacement cost bill for one item at a time in the Console. Future updates will add the ability to select and bill for multiple items at once.
Handle claim
Single claim items
Bulk claims
To make a bulk claim for multiple items:
- Navigate to the Activity tab > Checked out tab.
- Use the checkbox next to the checked-out items to select the items you would like to claim returned.
Note: To select all Checked out items, click the checkbox at the top left of the list of checked-out items:

- Click the arrow next to Register fine and select Handle claim. The Handle claims form will open. The titles, item barcodes, costs of the items, and any associated fine amounts will be automatically populated on the form for each of the selected items and cannot be edited.
Note: A warning message showing the library's claim limit policy will also display above the form. If the customer has exceeded the total number of claims allowed, this information will also display here.
- For each item, select a claim type from the Claim type drop-down menu (required).
- Optionally, a Handle claim note can be added for each item as well.
- Click Submit to save the claims. After the claims have been made, the claims returned or claims never had items will appear on the Claims tab. The claims will remain on the claim screen until the library’s configured time period for counting claims has passed. If a claimed item is recovered, it will automatically change from “unrecovered” status to “recovered” status at check-in.
For more information on handling claims returned items, see Handling claims returned items.