Issue tickets
Learn how to issue event tickets to customers and guests in the Wise staff client.
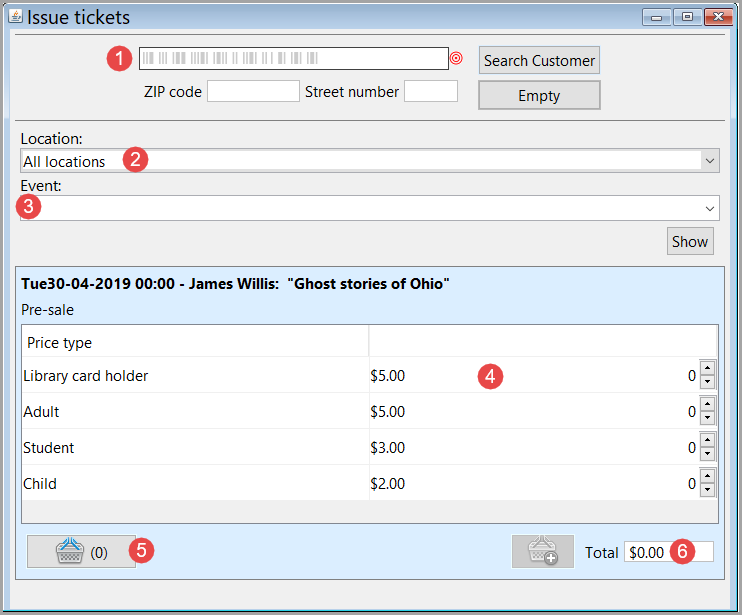
Tickets can be sold or given to customers via the staff client. To open the Issue tickets window, in the staff client, go to Tickets > Tickets.

To issue tickets:
- Select the customer to whom the ticket(s) are being issued.
- Enter the customer barcode or search term in the barcode field, or use the Zip core or street number to search for the customer.
- Click Search Customers. A search window opens.
- Tickets can be issued to library customers, non-library customers, or anonymously.
- If the ticket(s) are being issued to a library customer, use the search options to locate and select the customer account and click OK.
- If the ticket(s) are being issued to a non-library customer, but information is required, create a Ticket sale customer and then use that account information to continue the process.
- If the ticket(s) are being issued anonymously, click Anonymous at the bottom of the screen.
- (Optional) If the wrong customer is selected by mistake, click Empty to clear the selection and search again.
- Select the event location from the Location drop-down list. To view all available events, select All locations.
- Select an event from the Event drop-down list.
- Click Show. Ticket selections will appear in the lower portion of the screen.
- Select the number of each type of ticket the customer wishes to receive using the up and down arrows next to the ticket price. The amount of tickets selected will appear in the shopping cartt (highlight 5) and the total cost of tickets appear in the Total field (highlight 6).
- Click on the Shopping cart with the plus sign (
 ) to complete the ticket sale. The shopping cart window opens.
Note: This action must be completed for free tickets as well as purchased tickets in order to print the tickets.
- (Optional) If the customer has a discount code, enter the code in the Discount code field to provide a discount on tickets.
- Click one of the following buttons to proceed:
- Continue shopping closes the sales window so that additional tickets can be added to the customer's cart
- Paying opens the payment screen so that a payment can be processed, continue to step 8
- Empty cart removes items from the cart
- To remove individual items from the cart, click the shopping cart with the minus sign next to the tickets you want to remove
- To complete a ticket transaction and print tickets, you must proceed with Paying.
- If the tickets are free, they will be printed immediately.
- If the tickets have a cost, the Payment ticket sale window opens, displaying the total amount and payment input fields. Costs can be paid immediately, or if the tickets are not being sold anonymously, they can be registered to the customer account.
- Enter the payment amount in the Cash Drawer or Registering field, or click All to indicate that the exact amount is being paid or registered to the customer account. Customers can make partial payments and register the remaining amount to their library account.
- Click OK. If change is due to the customer, a notification message appears indicating the amount.
- (Optional) Return change to the customer and click through cash drawer to continue.
- The tickets are printed.